


Of all the hairstyles we’ve come to know and love over the years, the chignon has undoubtedly earned its place as one of our favorites. This deceptively simple yet chic style is one of the most versatile hairstyles around—it looks just as good with an elegant gown as it does with your favorite athleisure wear.
The interesting thing about chignon hairstyles is that they appear so straightforward that few people have bothered to articulate the steps actually needed to create one. And while they’re slightly more intricate to pull off than your run-of-the-mill bun, once you know the right steps, they’re easy to master. Ahead, we’ve put together a guide on how to style a chignon bun worthy of the red carpet.
What Is a Chignon?
Simply put, a chignon is a sophisticated style of bun. However, there are a few distinct features that separate chignons from other types of buns, such as messy buns and the classic ballerina: First, chignons are typically placed at the nape of the neck instead of at the crown or the middle of the head. Second, chignons often involve wrapping or tucking sections of hair within the bun, yielding a swirled, 3D shape. These characteristics give the chignon bun its signature elegant look, making it a staple for more formal occasions.
What is the difference between a bun and a chignon?
While both hairstyles involve gathering hair into a round shape, the primary differences between a bun and a chignon are their placement and overall style. A bun can be positioned anywhere on the head—high, mid-level, or low—often resulting in a casual or relaxed look. A chignon, on the other hand, is specifically placed at the nape of the neck and is characterized by a more polished and structured appearance. And while all chignons are a type of bun, not all buns are chignons.
What is the meaning of the word chignon?
The word "chignon" actually comes from the French phrase "chignon du cou," which translates to "nape of the neck."
Good hair day by @this.afrothing.
How Do You Do a Chignon?
When creating a chignon bun, it’s important to have the right tools and products at your disposal. Here are the essentials:
What you'll need:
- A hairbrush or comb
- Hair elastics
- Bobby pins
- Haircare products, such as texturizing and finishing hairsprays (optional)
Once you’ve assembled the must-haves, you can get to styling. Below we’re breaking down how to create the most classic version of a chignon bun hairstyle. Then, later, we’ll share some tips on how to take your ‘do to the next level. Let’s begin…

Step 1: Prep your hair
When prepping your hair for a chignon, it typically doesn’t matter if you start with freshly washed hair or third-day strands—both clean and dirty hair have unique advantages. The former may boast more shine and sleekness, which is ideal for sophisticated, slicked-back looks. The latter, meanwhile, tends to provide more texture and grip, which is beneficial for those with straight or fine hair that struggles to hold an updo. (You can also fake the look and feel of unwashed hair by spraying a bit of a texturizer, like Shu Uemura Art of Hair Wata Wave Texturizing Spray, through your strands to give it some volume and grit.) Ultimately, go with the option that works best for you and fits the occasion.
Regardless of whether you opt for newly washed hair or style a week-old blowout, you must ensure that your hair is fully detangled before shaping your bun. Knots can disrupt your chignon and prevent you from achieving that neat, polished look you’re after. Work a boar-hair bristle brush or a wide-toothed comb through your hair until the tool glides smoothly through your hair without snagging. For stubborn knots, spritz a leave-in like Mizani 25 Miracle Milk Leave-In Conditioner onto the area to loosen tangles and prevent breakage.
Once detangled, brush your hair to the nape of your neck and tie it into a low ponytail before moving onto the next step.
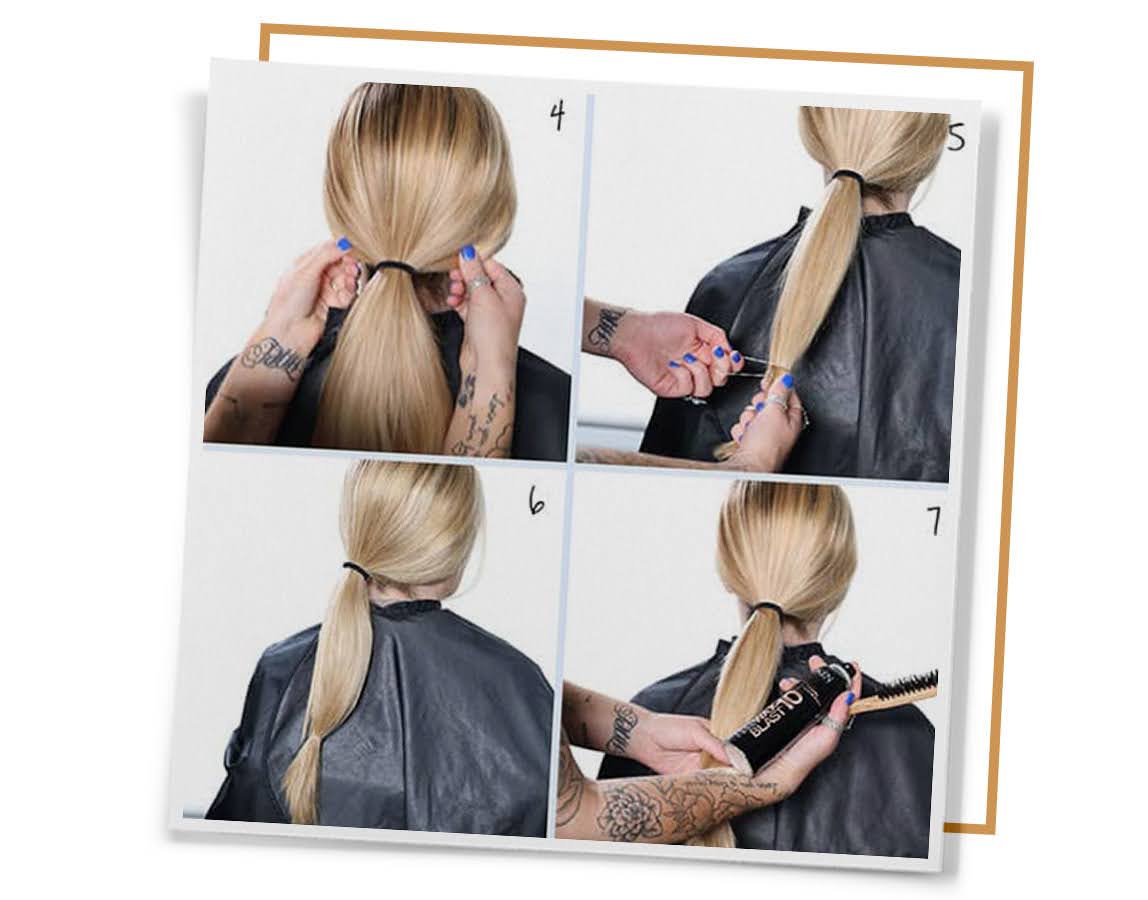
Step 2: Perfect your ponytail
The key to achieving an impeccable chignon lies in striking the perfect balance between undone glamor and polished structure. Chignon hairstyles are often thought of as stuffy, no-nonsense styles, but pulling out a few loose tendrils can take your chignon from a severe everyday look to something much softer. Just gently pull on the ponytail you made to loosen it up and create volume at the crown of your head. Then, carefully separate a few face-framing wisps from your ponytail to give your ‘do a soft, romantic vibe.
Next, take a clear hair elastic and secure it about two inches above the end of your ponytail. This will help keep the ends of your hair neatly tied together when you wrap your chignon. If you need to add texture to your ponytail before styling it into a chignon, spray it lightly with Redken Spray Wax (formerly known as Redken Wax Blast 10 Finishing Hair Spray, as pictured above). This medium control wax aerosol hairspray, which is made with vitamin E and fixing polymers, delivers a tousled look with a satin-matte finish.
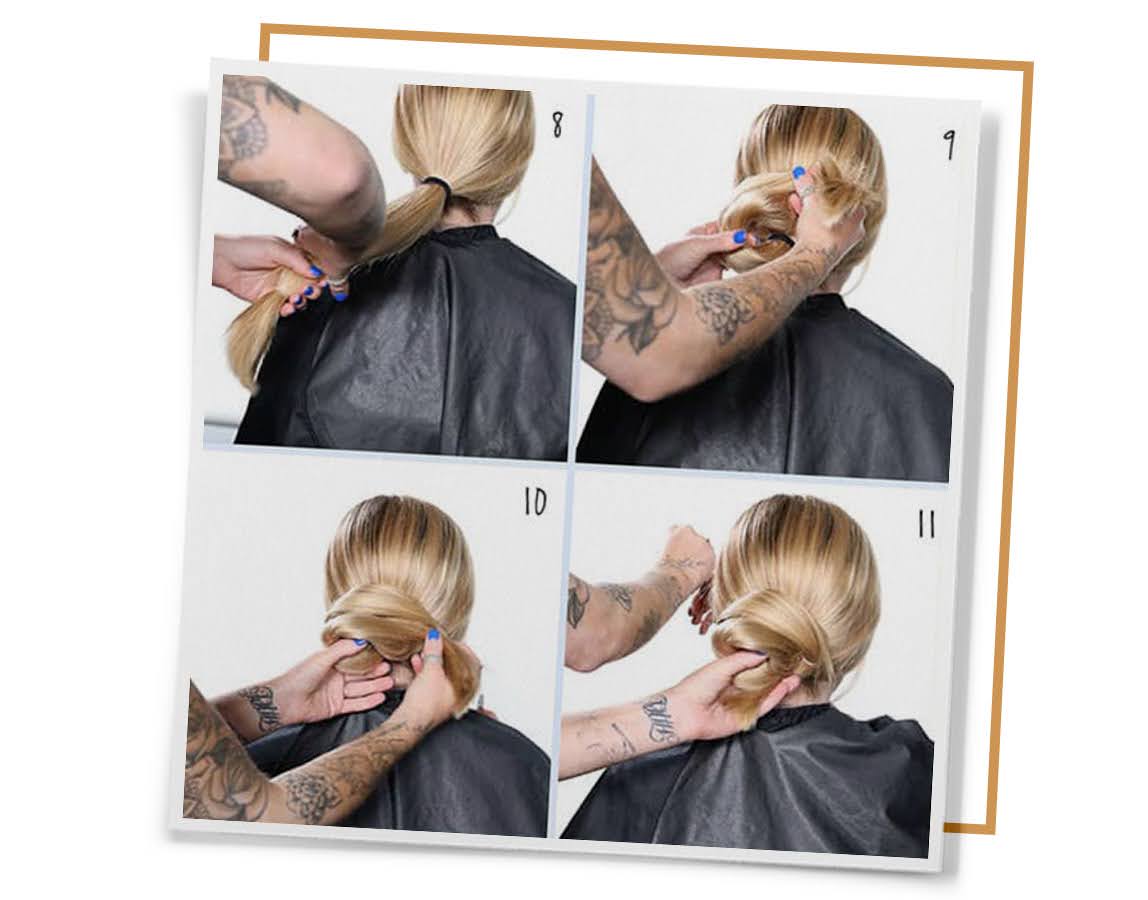
Step 3: Create your chignon
Now, here’s where the magic happens: creating the actual chignon. Take the end of your ponytail and lift it upward, wrapping the ponytail around the base of the elastic to form a swirly shape. Use a few bobby pins to secure the chignon in place until it feels stable.
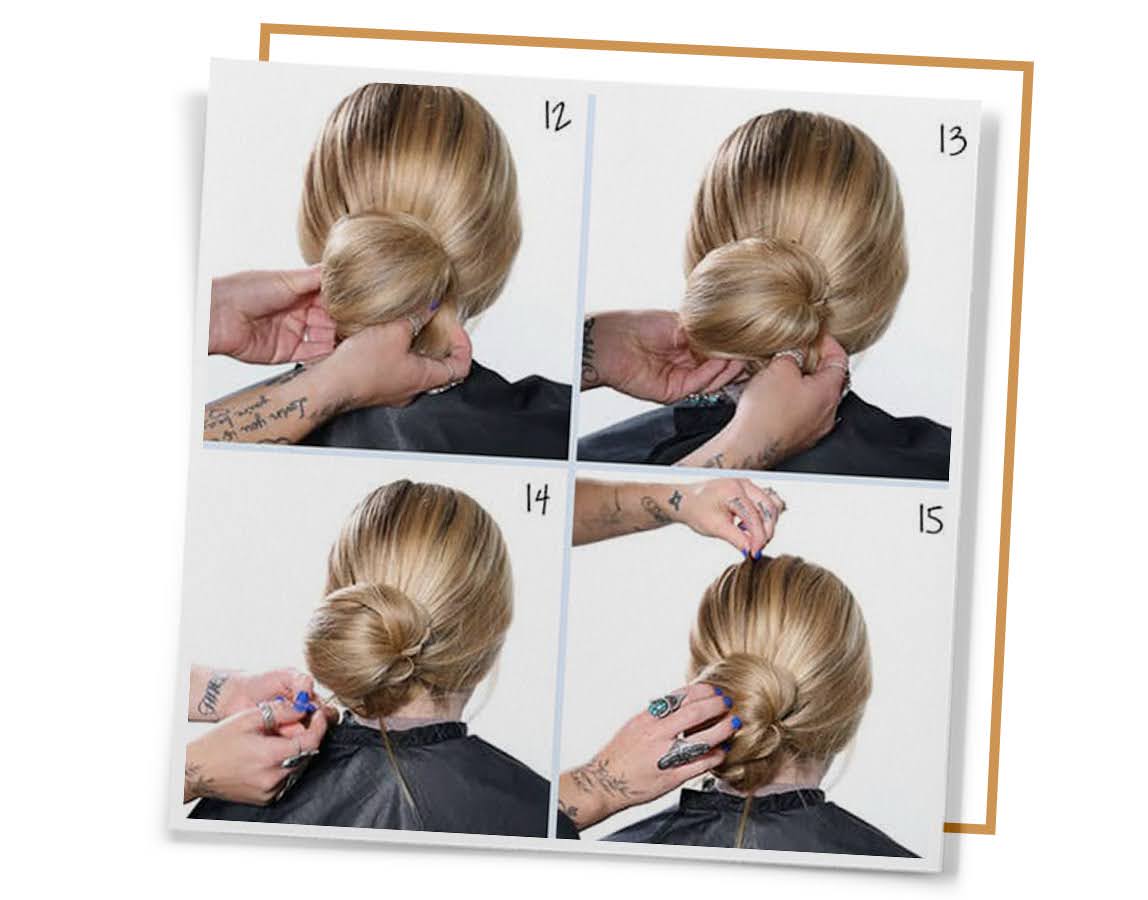
Step 4: Secure the chignon
Continue placing bobby pins in your chignon to ensure it’s securely fastened to the back of your head, but don’t pin it too tight–you still want to ensure it retains a slightly relaxed appearance. Once you’re finished, take the hair from the top of the chignon and gently fan it over the entire bun to create the illusion of a tucked-in look. Use several more bobby pins to secure this top section in place and lightly mist it with a brushable hairspray. We’re partial to the Pureology Soft Finish Flexible Hold Hairspray, which offers flexible hold, touchable softness, and tons of shine.
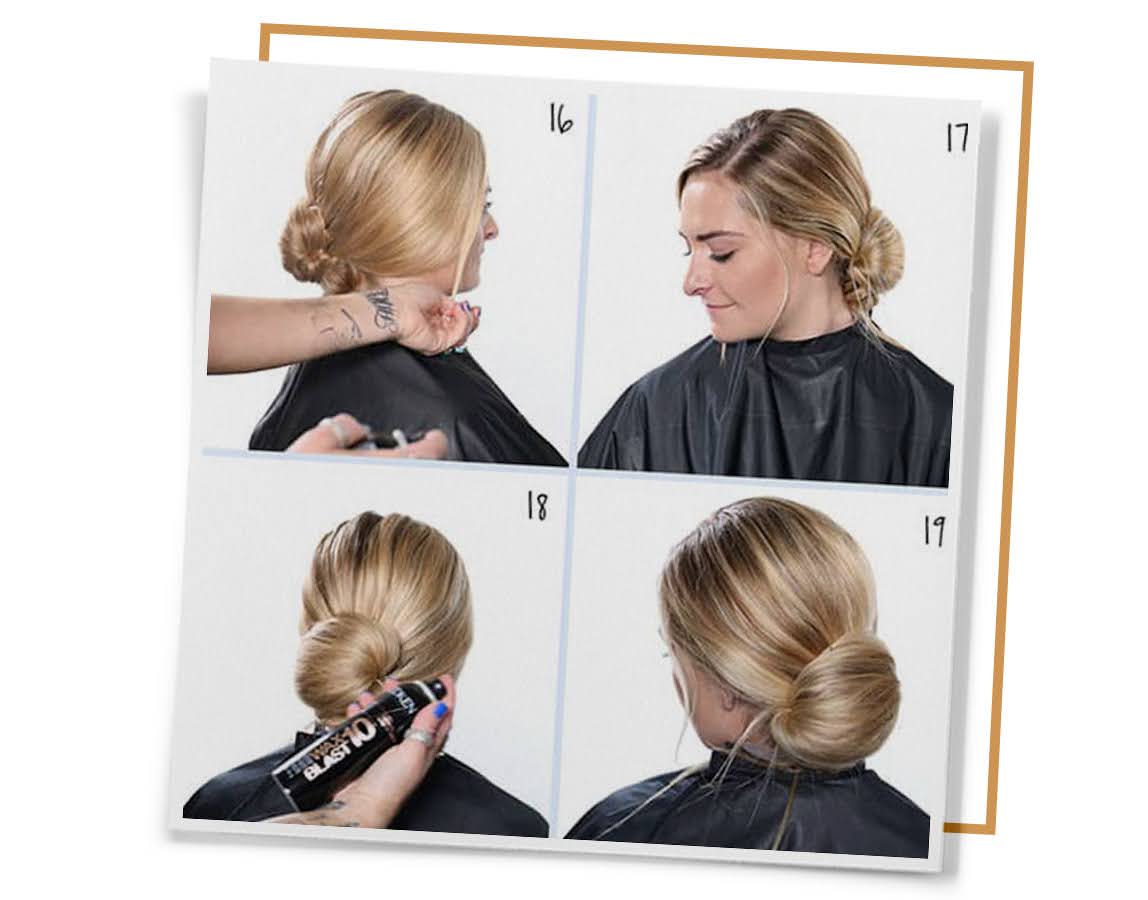
Step 5: Add your finishing touches
Once your chignon bun is securely in place, it’s time to add the final touches to the rest of your hair. For a looser, undone look, gently tug the sides of your hair to fan them over your ears. Then, use a flat iron or a curling wand to curl your tendrils away from your face to enhance that feminine, romantic flair (just be sure to use a heat protectant like L’Oréal Professionnel’s Metal Detox Concentrated Hair Oil first!).
If flyaways conspire to ruin your sleek finish, rub a pea-sized amount of Pureology’s Style + Protect Shine Bright Taming Serum in your hands and run it through the sides of your hair. This lightweight serum tamps down frizz and rogue flyaways while adding beautiful, radiant shine. Finally, set your look with hairspray to ensure your chignon hairstyle stays in place throughout the day or night
Tips for Taking Your Chignon to the Next Level
Once you master the basic chignon bun hairstyle, you can easily adapt it to suit your personal style. Here are five ways to put a fresh twist on your next chignon:
- Braids: Add a side braid (or two) before twisting your hair into a chignon. You can create a simple three-strand braid or get creative with a fishtail or Dutch braid. Plaits are a great way to add texture and visual interest to your style—and they don’t take too long to execute.
- Flower accents: Enhance your chignon with fresh or faux flowers. Pin a small cluster of blooms at the base or on one side of your bun for a romantic touch. Choose colors that complement your outfit for a cohesive look.
- Decorative barrettes: Use decorative barrettes or hairpins to secure your chignon. Opt for statement pieces, like jeweled clips or vintage-inspired designs, to add a bit of sparkle and personality.
- Pops of color: Experiment with temporary hair color sprays or hair chalk to add a pop of color to your chignon—perfect for concerts or festivals. You can highlight strands around your face or add subtle streaks throughout for a playful twist.
- Boho texture: Before styling your chignon, create some waves or curls with a curling wand. This will add body and movement to your hair, making your chignon look extra voluminous. Before styling, prep your mane with a heat protectant like Biolage Professional Hydra Source Blow Dry Shaping Lotion for the ideal combination of heat protection, weightless hydration, and shape memory.
Next Up: How To Do a Braided Bun in 6 Easy Steps
Header photo credits: SalonCentric
Use our salon locator to try a chignon bun with a professional near you.


